Your transmission problem likely isn’t the $2,000+ mechatronic unit itself—it’s just the last, most expensive link in a ‘failure cascade’ you can learn to identify.
- Most mechatronic issues are triggered by upstream problems, like cheap sensors failing in extreme Canadian cold or outdated transmission software causing harsh shifting.
- Understanding this chain reaction gives you the knowledge to challenge a mechanic’s initial diagnosis and avoid paying for unnecessary, high-cost replacements.
Recommendation: Instead of asking “How much to fix it?”, learn to ask “What caused it to fail?”. This guide shows you how to trace the problem to its source.
The ‘Check Engine’ light glows ominously on your dashboard, especially unwelcome on a frigid -20°C morning in Québec. Your transmission hesitates, shudders, or slams into gear. A quick search online fills you with dread: “mechatronic failure.” The forums and generic guides all offer the same disheartening advice: prepare for a multi-thousand-dollar bill at the dealership. They list symptoms but offer no real insight, leaving you feeling powerless, waiting for a mechanic to deliver a verdict that will cost you dearly.
This approach is fundamentally flawed because it treats the symptom—the failed mechatronic unit—as the entire disease. But what if the true problem wasn’t the expensive, complex module itself? What if it was merely the final victim in a chain reaction, a “failure cascade” that began with a much cheaper, simpler component? Dealerships and many shops profit from this lack of understanding, charging exorbitant diagnostic fees and pushing for full replacements because it’s the easiest, most profitable answer for them. They count on you not knowing the right questions to ask.
This guide is your antidote. As a technician who has seen countless drivers overcharged for these issues, I’m going to pull back the curtain. We will dismantle the myth of the “sudden mechatronic failure” and replace it with the concept of the failure cascade. You’ll learn why cheap sensors are a death sentence in Canadian winters, how a simple software update can sometimes solve a major mechanical shudder, and why paying for “diagnostic time” can be a smart investment—if you know what you’re paying for. This isn’t about turning you into a mechanic overnight; it’s about giving you the “diagnostic intelligence” to have an informed, confident conversation that protects your wallet.
For those who want a visual deep-dive into the complexity of these units, the following video shows a complete replacement of a DSG mechatronic module. It provides a practical look at the component we’ll be discussing, illustrating exactly why this is a job best left to specialists, but a problem best understood by you.
To arm you with this crucial knowledge, we will break down the entire ecosystem of your vehicle’s mechatronic system. This article explores each link in the chain, from the sealed-for-life modules to the sensors that feed them information, giving you the tools to understand the root cause of the problem.
Summary: Understanding the Mechatronic Failure Cascade
- Why You Cannot Repair Modern ABS Modules but Must Replace Them?
- How to Reset Your Car’s ECU After a Battery Swap in -20°C Weather?
- OEM vs Generic Sensors: Which One Actually Works in Canadian Winters?
- The $2,000 Transmission Failure Caused by Ignoring a $50 Sensor Glitch
- Can a Software Update Really Fix Your Transmission Shudder?
- How to Reset Your ECU to Fix Rough Idling Issues at Home?
- Why Do Mechanics Charge “Diag Time” Even If They Don’t Fix the Car?
- Is the Subscription Model for Heated Seats Coming to Canada?
Why You Cannot Repair Modern ABS Modules but Must Replace Them?
One of the first things to understand about modern automotive electronics, like your ABS or transmission control module, is that they are intentionally designed to be non-serviceable. Mechanics aren’t being lazy when they tell you it needs to be replaced; they are stating a physical reality. The reason lies in a process called potting or encapsulation, where the entire circuit board is flooded with a hard, protective epoxy resin.
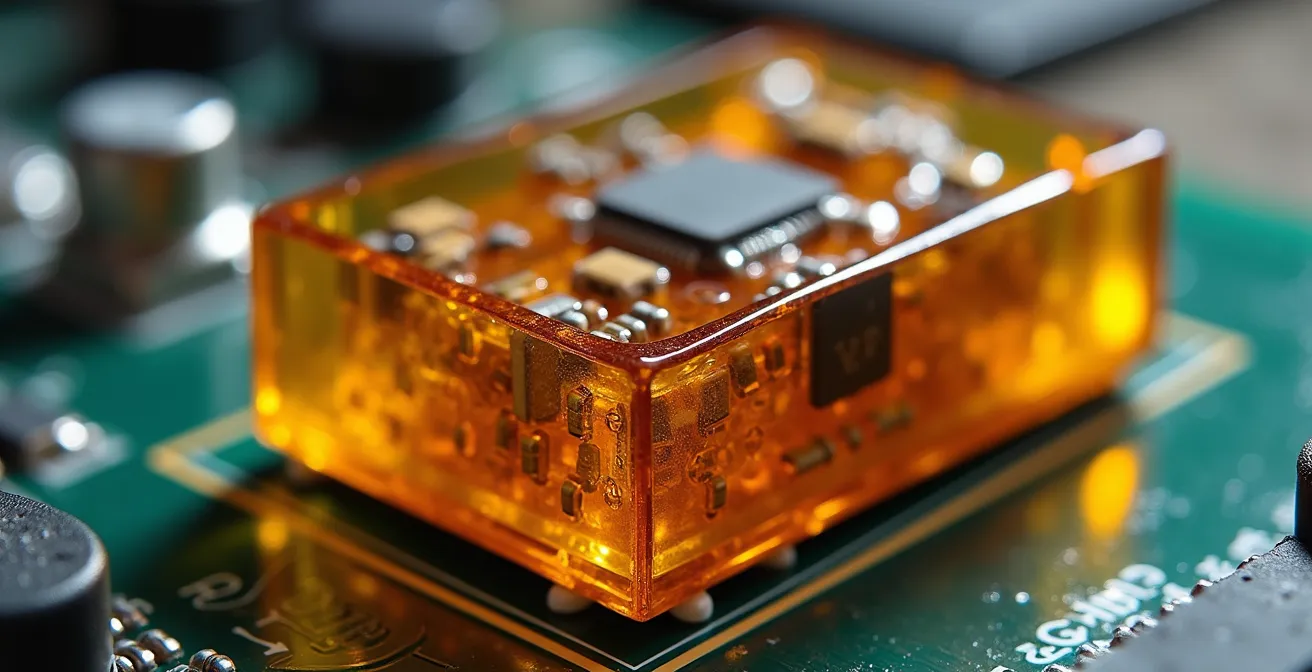
This isn’t a cost-cutting measure; it’s a durability feature. This solid block of epoxy protects the delicate electronics from the harshest conditions imaginable: extreme vibration, moisture, road salt, and the wild temperature swings of a Canadian climate. As a case study on automotive potting implementation highlights, these compounds are chosen for their extreme temperature resistance, often from -55°C to +130°C, and their flame-retardant properties. This process is so critical that the market for these materials is massive; a 2024 potting compound industry analysis values the global market at over $3.63 billion. The downside is clear: once the components are entombed in epoxy, there is no way to access and repair a single failed resistor or solder joint. The entire module becomes a single, disposable unit.
How to Reset Your Car’s ECU After a Battery Swap in -20°C Weather?
A common scenario in Canada: your battery dies in the dead of winter, and after replacing it, the car runs terribly. It idles rough, shifts poorly, and feels completely out of sync. This often happens because disconnecting the battery erases the “learned” values stored in the Engine Control Unit (ECU). The ECU needs to relearn everything from the ideal idle speed to the throttle position. A basic ECU reset, or “relearn procedure,” can often solve this.
The simplest method involves these steps: First, ensure all accessories (radio, lights, HVAC) are off. Second, turn the ignition key to the “ON” position (without starting the engine) and leave it there for about 30-60 seconds. This allows the ECU to cycle and recognize all the car’s sensors. Third, turn the key off, wait 10 seconds, and then start the engine. Let it idle for several minutes without touching the accelerator. However, the extreme cold adds a layer of complexity. A brand-new battery can struggle to provide stable voltage at -20°C, which can interfere with the relearn process. If a simple reset doesn’t work, the issue might be more than just lost memory.
It’s important to distinguish between a reset-related glitch and a genuine hardware fault. Many mechatronic issues are temperature-dependent. For instance, DSG specialist forums report that many shifting problems only appear after 15 minutes of driving, once the transmission fluid and the mechatronic unit itself reach operating temperature. If your issue persists after a proper ECU reset and is consistently triggered by heat, the problem lies deeper than just software memory.
OEM vs Generic Sensors: Which One Actually Works in Canadian Winters?
Here is a critical link in the failure cascade that many drivers overlook to save a few dollars: sensor quality. Your car’s mechatronic units are only as smart as the information they receive. The transmission control module, for example, relies on dozens of sensors—input/output speed sensors, temperature sensors, pressure sensors—to make split-second shifting decisions. When you choose a cheap, generic aftermarket sensor over an Original Equipment Manufacturer (OEM) part, you are gambling with the health of your entire transmission.
The difference isn’t branding; it’s engineering and materials science, especially critical for withstanding Canadian winters. OEM sensors are designed and tested for the specific vehicle and its operational extremes. Generic sensors are designed to “fit” a wide range of vehicles and meet a low price point. In the bitter cold, the inferior plastics of a generic sensor can become brittle and crack, allowing moisture and road salt to corrode the internal electronics. This leads to intermittent or completely false readings, feeding garbage data to the ECU. The transmission, trying to operate based on this bad data, can cause harsh shifts, clutch slippage, and ultimately, catastrophic damage to the mechatronic unit.
This isn’t just theory. The differences in material quality and temperature tolerance are well-documented. A detailed comparison reveals the stark reality of what you’re paying for.
| Sensor Type | Temperature Range | Material Properties | Typical Failure Mode |
|---|---|---|---|
| OEM Sensors | -55°C to +130°C | High-grade plastics with fuel/oil resistance | Gradual degradation after 150,000km |
| Aftermarket Premium | -40°C to +120°C | Standard automotive-grade compounds | Intermittent failures in extreme cold |
| Generic/Budget | -20°C to +100°C | Basic plastics prone to brittleness | Cracking and moisture ingress below -20°C |
As you can see, the generic sensor’s operational range barely covers a typical Canadian winter day. Choosing OEM isn’t about paying for a logo; it’s about paying for a component that won’t fracture and fail when the temperature plummets, protecting the multi-thousand-dollar components downstream.
The $2,000 Transmission Failure Caused by Ignoring a $50 Sensor Glitch
Now we see the “failure cascade” in action. Let’s paint a picture: your car starts showing a minor, intermittent shifting quirk. Maybe it’s a slight hesitation when accelerating from a stop. You ignore it, thinking it’s just a cold-weather oddity. What you don’t realize is that a $50 transmission output speed sensor—a cheap aftermarket part installed last year—is starting to fail in the cold. It occasionally sends an incorrect speed reading to the Transmission Control Module (TCM).
The TCM, believing the car is moving slower than it is, commands a gear change at the wrong time. This causes a moment of clutch slip. Over weeks and months, these tiny, imperceptible moments of extra wear add up. The clutch packs begin to glaze over, and clutch material starts contaminating the sensitive hydraulic fluid. This contaminated fluid then clogs the tiny channels and solenoids inside the expensive mechatronic unit. Eventually, a solenoid sticks, the transmission can’t engage a gear properly, and the dreaded “PRNDS” flashing light appears. You take it to the shop, and they diagnose a “failed mechatronic unit.” The repair bill is staggering; forum data shows typical repair costs of over $2,600 CAD for parts plus another $700 in labor at a dealership.
The mechanic isn’t wrong; the mechatronic unit *has* failed. But the root cause wasn’t the unit itself. It was the $50 faulty sensor you ignored months ago. By understanding this cascade, you can change the conversation. Instead of accepting the diagnosis at face value, you can ask, “Did you check the input and output speed sensor readings? Are there any fault codes for sensors that could have led to this?” This demonstrates your knowledge and forces a more thorough diagnosis, potentially saving you from replacing a part that was merely a victim of another’s failure.
Can a Software Update Really Fix Your Transmission Shudder?
Sometimes, the problem isn’t mechanical at all, but digital. Car manufacturers are constantly refining the software that controls their vehicles. The logic that governs how and when your automatic transmission shifts is incredibly complex, and sometimes they don’t get it right on the first try. A common complaint on many modern transmissions, like Volkswagen’s popular DSG, is a “shudder” or “jerkiness” when starting from a stop. Owners assume the worst, fearing a failing clutch or mechatronic unit.
However, manufacturers often release software updates via Technical Service Bulletins (TSBs) to address these known issues. These updates can refine shift points, adjust clutch engagement pressure, and smooth out operations, completely eliminating the shudder. A good dealership or specialist shop will always check for available TSBs before recommending any expensive hardware replacement. It’s often the first and most cost-effective step in the diagnostic process. This highlights the importance of distinguishing between a hardware problem and a software problem.
Case Study: The Volkswagen DSG Software Flash Fix
Many VW models with the DSG transmission, particularly those with 50,000-70,000 km, develop a noticeable shudder when accelerating from a standstill. While this feels like a serious mechanical issue, it is often a known software calibration problem. As documented by specialist shops like A6 Autos, dealerships can perform a TCM software flash. This procedure, which typically takes about an hour of labor, overwrites the old shifting logic with an updated version from the manufacturer. In a high percentage of cases, this software update completely resolves the shuddering issue without any need to replace the clutches or the expensive mechatronic unit, demonstrating how a digital fix can solve a physical symptom.
This is empowering knowledge. If your car is exhibiting a common, well-documented issue like a transmission shudder, your first question to the service advisor should be: “Are there any TSBs or software updates available for the transmission on this model?” This simple question can be the difference between a one-hour labor charge and a $3,000 repair bill.
How to Reset Your ECU to Fix Rough Idling Issues at Home?
Following a battery swap or a deep discharge, one of the most common complaints is a rough, unstable idle. The engine might hunt for a steady RPM or even stall. While a basic ECU reset can sometimes help, the issue often lies specifically with the Electronic Throttle Body (ETB) losing its calibration. The ECU no longer knows the precise closed and open positions of the throttle plate, leading to incorrect air-fuel mixtures at idle.
Fortunately, performing a throttle body “relearn” procedure is something you can often do at home with basic tools, saving you an immediate trip to the shop. This process recalibrates the system. While the exact steps can vary slightly by manufacturer, the general procedure is a reliable first step in troubleshooting post-battery-swap idling problems. It requires patience and following the sequence exactly, as skipping a step can prevent the system from resetting correctly.
Before paying for a diagnostic, attempting this procedure can potentially solve the problem in your own driveway. It’s a prime example of using a bit of knowledge to save on labor costs for a common, simple-to-fix issue.
Your Action Plan: Electronic Throttle Body Relearn Procedure
- Access and Clean: Carefully remove the throttle body from the intake manifold. Clean the throttle plate and bore with a dedicated throttle body cleaner and a lint-free cloth to remove any carbon buildup that could impede movement.
- Reinstall and Secure: Reinstall the throttle body, using a new gasket if the old one is damaged. Ensure all connections are secure.
- Ignition On, Engine Off: Turn the ignition to the “ON” position but DO NOT start the engine. Wait for a full 30 seconds. During this time, you may hear the throttle body motor cycling as it finds its new closed position.
- Idle Learn: Start the engine and let it idle completely untouched. Do not press the accelerator or turn on any accessories (like A/C). Let it idle for a full 5 minutes to allow the ECU to learn the stable idle parameters.
- Verify: Turn the engine off, wait 10 seconds, and then restart it. The idle should now be smooth and stable. If not, the issue may lie elsewhere.
Why Do Mechanics Charge “Diag Time” Even If They Don’t Fix the Car?
This is perhaps the most frustrating charge for any vehicle owner: paying $150 or more for “diagnostic time” only to be told “we’re not sure” or to be given a massive quote you can’t afford. It feels like paying for nothing. But this is where we must separate a good shop from a bad one. You’re not paying for a mechanic to simply plug in a generic code reader; you’re paying for their expertise and access to professional-grade tools.
Properly diagnosing a complex mechatronic issue is detective work. A generic P-code from an auto parts store scanner only points to a symptom, not the cause. A professional technician uses expensive, subscription-based tools like Alldata or Mitchell 1 to access vehicle-specific wiring diagrams and TSBs. They use advanced hardware like an Autel MaxiSYS or VAG-COM to perform live data logging, measuring transmission pressures, clutch slip, and solenoid command timing in real-time. As noted by specialists, a proper diagnostic at a reputable shop is extensive, including pressure tests and shift-timing analysis. This requires time and highly skilled personnel; reputable shops employ technicians with advanced qualifications to interpret this complex data.
So, when is it worth paying for? You should pay for diagnostic time when the shop can provide you with a detailed report of their findings. Don’t accept “the computer says it’s the mechatronic.” Ask for the specific fault codes, the live data logs that support their conclusion, and whether they checked for related TSBs. Paying for a diagnosis that proves a $50 sensor is the root cause is money well spent. Paying for a guess is not. A good diagnosis provides a definitive path to repair, even if you choose to have the work done elsewhere.
Key Takeaways
- A ‘mechatronic failure’ is often the final symptom of a ‘failure cascade’ starting with cheaper components like sensors or bad software.
- In Canada’s climate, OEM sensors are critical. The inferior materials of generic sensors can crack in the cold, sending bad data to your car’s computer.
- Before approving a major repair, always ask if there are any Technical Service Bulletins (TSBs) or software updates that address your specific issue.
Is the Subscription Model for Heated Seats Coming to Canada?
The recent trend of car manufacturers placing basic features like heated seats behind a monthly subscription paywall is a worrying sign of the industry’s direction. It speaks to a larger philosophy of control, where the manufacturer, not the owner, dictates how the vehicle can be used and repaired. This same philosophy is what drives the “replace, don’t repair” mentality for complex components like mechatronic units. They create a closed system where the dealership is positioned as the only viable solution, often at a premium cost.
But there is a powerful counter-movement in the independent repair world: remanufacturing. While you can’t repair a potted module in your garage, specialized independent shops have developed sophisticated processes to do just what the manufacturer says is impossible. They can de-pot modules, replace failed internal components, and rebuild them to a standard that often exceeds the original. This is the ultimate form of empowerment against manufacturer monopolies.
Remanufactured mechatronics are as good as, or better than, new, typically at around half the cost of a new unit, with a 1-year warranty for peace of mind.
– Mayfair Gearbox Technical Team
These specialists aren’t just swapping parts; they’re engineering better solutions. For example, some remanufacturing programs involve precision-measuring valve bores, installing upgraded seals, and flow-matching solenoids before subjecting the unit to full hot and cold test cycles. This proves that a robust, competitive independent market can deliver higher quality at a lower cost. So, while the threat of subscription models looms, remember that the spirit of repair and improvement is alive and well, offering a powerful alternative for the informed owner.
Armed with this knowledge, you are no longer a passive customer but an informed vehicle owner. You understand the failure cascade, the importance of quality components, and the right questions to ask. The next time a warning light appears, don’t just ask “How much to fix it?”; ask “What was the first step in the failure cascade?” and “Have you checked for any software updates?”. This shift in approach is your single greatest tool in preventing overcharges and ensuring your vehicle is repaired correctly and cost-effectively.